Tutorial : Microsoft Expression Design Basics
Hey guys,
I am back with another tutorialand this time it is basics of MicrosoftExpression Design. I know that a lot of you guys would like to use Expression design and may not be able to use it as you might not know the basics. So just give 30 minutes of your your time and go along with the tutorialand you will be up with the basics of MicrosoftExpression Design. What is Microsoft Expression Design and What it does?
Microsoft Expression Design is a powerful illustration tool that allows you to create both vector and bitmap graphics for use in projects created with the other applications in the Studio suite, including Expression Web and Expression Blend. It is only available for purchase as part of Expression Studio and not as a standalone application.
As a tightly integrated member of the Studio suite, Expression Design allows you to design custom web graphics and export them as GIFs or JPEGs for use in sites created with Expression Web. You can also use Expression Design to create custom user interface controls and export them in the native XAML format for use in interfaces created with Expression Blend. System Requirements for installing Microsoft Expression Design
Operating System:
Microsoft Windows XP with Service Pack 2 (SP2)
Windows Vista
Minimum System:
Intel Pentium or AMD processor, 1 GHz with MMX or equivalent
512MB of RAM
150 MB available hard disk space
1024 x 768 monitor resolution with 24-bit color
Graphics processor that is DirectX 9–capable
Recommended System:
Intel Pentium or AMD processor, 2 GHz with MMX or equivalent
1 GB of RAM
600 MB available hard disk space
Microsoft DirectX 9.0–capable video card with 256 MB or more of memory—for example, ATI Radeon X300
or NVIDIA GeForce 5600 class equivalent or better. Installing Expression design
Expression Design can only be purchased as part of the Expression Studio suite, which includes Expression Blend, Expression Web, and Expression Media. When you insert the Expression Studio installer CD, a setup guide automatically displays in your default web browser. You can use this guide to access the individual Expression Studio product installers. Use the following steps to install Expression Design onto your computer.
-
Insert the Microsoft Expression Studio CD into your drive.
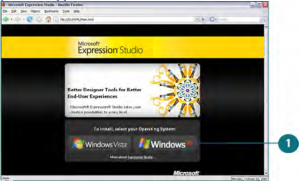 Insert the Microsoft Expression Studio CD into your drive
 -
If you are using Windows XP, install .NET Framework 3.0.
-
Click the Expression Design button to access the installer and choose Save File. Navigate to the default download location on your system and double-click the installer icon.
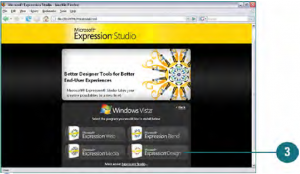 Click Expression Design Button
 -
The Microsoft Expression Design Setup Wizard appears. Click the Next button and follow the steps provided.
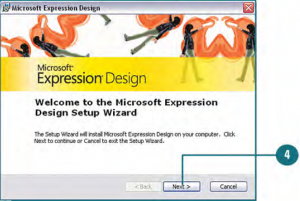 Expression Design Install Wizard
 -
When the installation is complete, click Finish to exit the wizard.
Launching Expression Design
-
Click the start button on the taskbar.
-
Point to All Programs
-
Click Microsoft Expression
-
Click Microsoft Expression Design
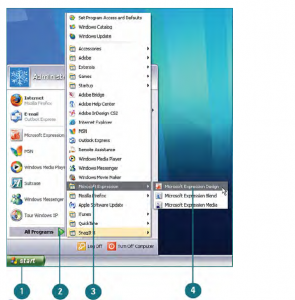 LaunchingExpressionDesign
 -
In the window that appears, enter your product key and click Continue.
Identifying Expression Design Interface Items
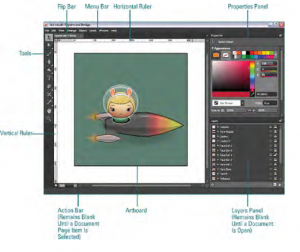
Opening a Document
Anytime you want to create artwork in Expression Design, you must do so within the confines of a document page. However, before you begin creating new documents, it helps to understand how to open pre-existing ones. Expression Design actually ships with some documents that are accessible through the Samples folder, which is installed along with the application. To access the Samples folder, navigate to the drive where you installed Expression Design; open the Program Files/Microsoft Expression/Design folder.
Choose the Open Command
- Under the File menu, choose Open.
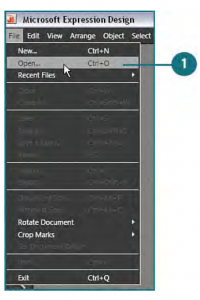
-
In the Open File dialog box that appears, navigate to the file you’d like to open.
-
Select the filename and click Open. The document automatically appears in the work area of the interface.
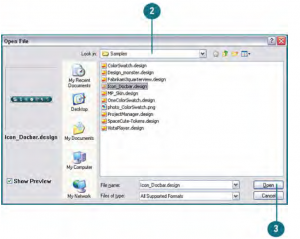
Note - you can also preview the document in Expression Design by checking the check box located in the lower left corner of the dialog box.
Opening Multiple Documents at Once
With Expression Design, you can also open multiple documents at once. This can be useful when working with multiple web graphics or interface items that are intended for use in much larger Expression Web or Expression Blend projects.
Select Multiple Files
-
Under the File menu, choose Open.
-
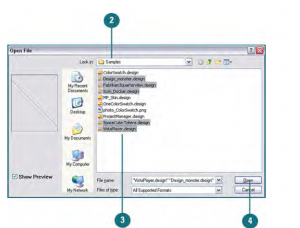
In the Open File dialog box that appears, navigate to the folder containing the files you’d like to open.
-
Shift+click to select adjacent filenames, or Ctrl+click to select nonadjacent files.
-
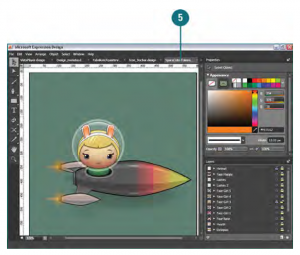
Click Open. The documents automatically appear stacked in the work area of the interface.
-
Each document’s name is displayed in a separate tab in the Flip bar. Click a tab to bring the corresponding document to the front.
Viewing Active Files
When you have multiple documents open, there are several different ways to control which one is currently being displayed. Expression Design contains a Flip bar at the top of the document window that displays the names of as many open documents as it can fit. By clicking the document name, you can bring it to the front of the stack. All open documents (including those not shown in the Flip bar) can be accessed via the active files list located under the Window menu, or via the Active Files menu to the far right of the Flip bar.
Choose the Document Name from the Window Menu
-
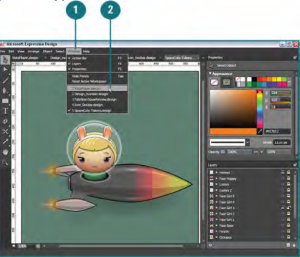
You can view a numbered list of open documents under the Window menu. The current document has a check mark displayed next to its name.
-
Select the name of the document you’d like to view.
Click the Document Name in the Flip Bar
- Each document’s name is displayed in a separate tab in the Flip bar. Click a tab to bring the corresponding document to the front of the stack.
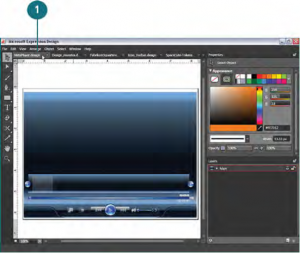
Note - Press Ctrl+Tab to view the next open document displayed in the Flip bar. Press Ctrl+Shift+Tab to view the previous document.
Choose from the Flip Bar Active Files Menu
- The Flip bar can only display a limited number of document tabs. If you know a document is open but do not see its name listed in the Flip bar, you can access it from the Active Files menu. To access the menu, click the down arrow in the upper right of the document window, on the far right of the Flip bar. The current document has a check mark displayed next to its name.
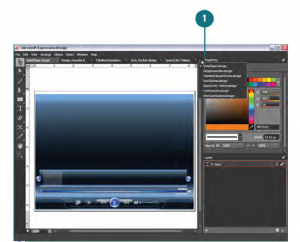
- Select the name of the document you’d like to view.
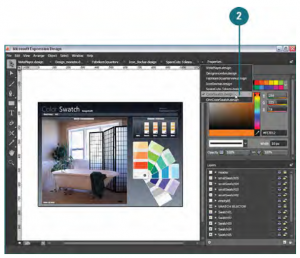
Hovering over a document name in the Flip bar reveals the current file location. When you hover over any document tab in the Flip bar, a tooltip appears to display where the file is currently stored on your system.
Creating a New Document
To create graphics in Expression Design, you must first create a document. Every document contains a frame, also referred to as the “artboard,” which determines the visible output area for your artwork. You can control the size of the document frame by entering specific width and height dimensions in the New Document dialog box. After the document is created, a black outline is displayed to indicate the position of the artboard. All the artwork that you intend to export or print should be placed within this area.
Choose the New Document Command
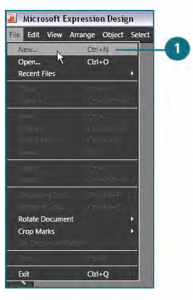
- Under the File menu, choose New.
-
In the New Document dialog box that appears, choose a preset document size from the Presets list, or enter specific width and height values in the fields provided. Choose the preferred measurement units from the list provided. This also determines what units will appear in the document rulers.
-
If necesssary, change the resolution value from the default setting (96 ppi, which is the standard for onscreen display). Web graphics are generally saved at 72 ppi, and print graphics at a minimum of 220 ppi.
-
It is not necessary to name the file when setting it up in the New Document dialog box, but the option is there if you’d like to. You can always name the file later when saving it.
-
Click OK to create the new document.
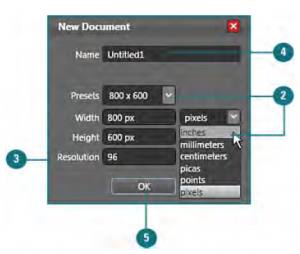
Saving a Document
As you work in Expression Design, you should periodically save your documents. Doing so allows you to preserve the work you’ve done and return to it later, even after you’ve closed the file. There’s nothing worse than losing hours of hard work due to a power surge or unexpected system shutdown. Therefore, in addition to saving, you might also want to consider investing in a battery backup for your workstation.
Choose the Save Command
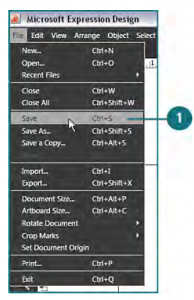
- Under the File menu, choose Save.
The Save command is only available when updating pre-existing documents—not when saving for the first time, which requires the use of Save As. You should also use Save As to avoid overwriting an original document that you’ve applied changes to. Doing so creates a copy of the document and allows you to change its name and system location.
Choose the Save As Command
-
Under the File menu, choose Save As.
-
Enter a name for the document in the File Name field of the Save As dialog box.
-
Choose a system location and click Save.
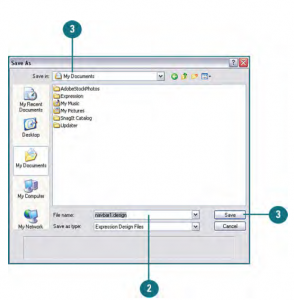
Setting Ruler Units
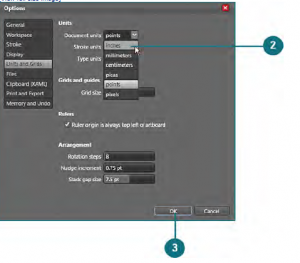
In addition to the artboard, every document also contains a set of rulers: one horizontal (top) and one vertical (left). Expression Design lets you decide which set of measurement units you’d like to display in the rulers. The Units and Grids Options include points, inches, millimeters, centimeters, picas, and pixels. Note that both rulers are always visible (there is no option to hide them), and that they both display the same measurement units.
Changing Document Ruler Unit Options
- Under the Edit menu, point to Options and choose Units and Grids from the fly-out menu.
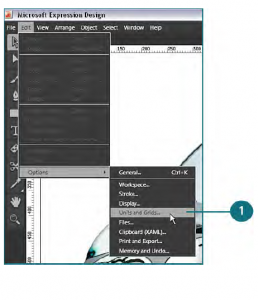
-
In the Options dialog box that appears, choose the preferred measurement units from the Document Units list.
-
Click OK to update the document rulers.
Setting Ruler Origin
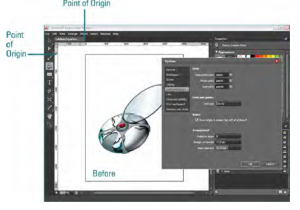
The ruler point of origin, also referred to as the “zero point,” is the location along the edge of the artboard where zero is positioned in the rulers. In Expression Design, you can choose to place the zero point for both rulers in the upper left corner of the artboard or place it in the upper left for the horizontal ruler and in the bottom left for the vertical ruler.
Changing the Ruler Origin Option
-
Under the Edit menu, point to Options and choose Units and Grids.
-
In the Options dialog box that appears, uncheck Ruler Origin Is Always Top Left of Artboard. This changes the ruler origin for the vertical ruler from the upper left to the bottom left.
Changing Document Size
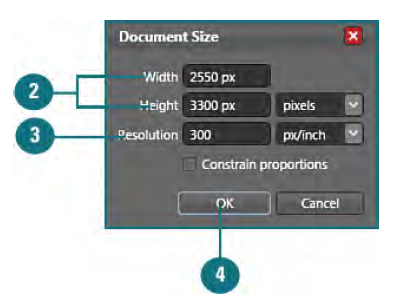
Anytime you need to change the overall size and/or resolution value of your artwork (for example, to resize a print graphic for use on the web), you can do so by using the controls available in the Document Size dialog box. Remember that any adjustments made using this method affect everything in the document, including the artboard and all your artwork.
Use the Document Size Dialog Box
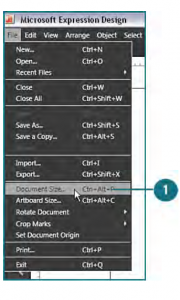
- Under the File menu, choose Document Size.
-
Enter new width and height values in the fields provided. Check Constrain Proportions to resize the document proportionally. If necessary, you can select a different measurement unit from the list provided. Doing so also changes the units that are displayed in the rulers after the dialog box is closed.
-
If necesssary, change the resolution value from its current setting. Web graphics are generally saved at 72 ppi, and print graphics at a minimum of 220 ppi.
-
Click OK to change the document size.
Changing the Artboard Size
If you’d like to resize the artboard without resizing your artwork, you can do so using the controls available in the Artboard Size dialog box. This allows you to extend your canvas and increase the output area or reduce it to crop away portions of your art.
Use the Artboard Size Dialog Box
-
Under the File menu, choose Artboard Size.
-
Enter new width and height values in the fields provided. If necessary, you can select a different measurement unit from the list provided. Doing so also changes the units displayed in the document rulers after the dialog box is closed.
-
Click any of the arrows in the Anchor grid to control which sides of the artboard will be added to or subtracted from. To add or subtract evenly from the center, leave the anchor point at its default setting.
-
Click OK to change the artboard size.
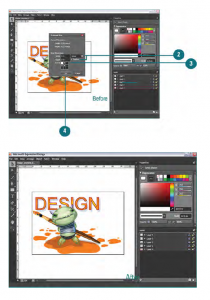
Viewing Artwork in Wireframe Mode
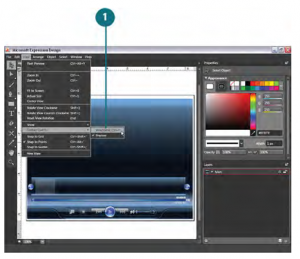
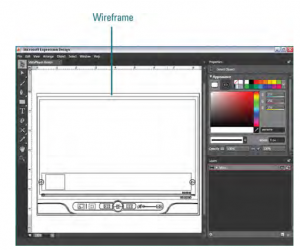
By default, Expression Design displays all documents in Preview mode, which reveals all applied attributes, such as fill colors, stroke colors, and effects. However, if you’d like to view the paths that make up the artwork without any attributes applied, you can do so by switching the Display Quality setting to Wireframe mode. This is a great way to take a look at what’s going on “under the hood” of your artwork. Switching to Wireframe mode can also make it easier to locate specific paths that you’d like to select and edit, especially when working with detailed pieces of art.
Change the Display Quality Setting
- Under the View menu, choose Wireframe from the Display Quality submenu. Expression Design displays the paths that make up the artwork without showing any applied fill and stroke colors or effects.
